Auto Save Using Ajax

Posted: May 7, 2016 in Ajax, ASP.Net, Jquery

Introduction

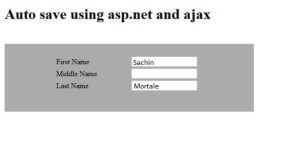
This article explains how to automatically save a value into a SQL database using an ASP.Net WebMethod and jQuery Ajax.

Jquery

The following code shows that SaveDraft.aspx is the aspx page and AutoSave is the method. We pass the client-side value to the server-side using Ajax and WebMethod.

$(document).ready(function () {
 // Configure to save every 5 seconds
 window.setInterval(saveDraft, 5000);//calling saveDraft function for every 5 seconds

 });

 // ajax method
 function saveDraft() {

 $.ajax({
 type: "POST",
 contentType: "application/json; charset=utf-8",
 url: "SaveDraft.aspx/AutoSave",
 data: "{'firstname':'" + document.getElementById('Firstname').value + "','middlename':'" + document.getElementById('Middlename').value + "','lastname':'" + document.getElementById('Lastname').value + "'}",

 success: function (response) {

 }
 });
 }


In the following code the saveDraft function fires every 5 seconds. The value will be saved in the database every 5 seconds without post-backs. Based on our requirements we can change the time interval.

 $(document).ready(function () {
            // Configure to save every 5 seconds
            window.setInterval(saveDraft, 5000);//calling saveDraft function for every 5 seconds

        })


Database structure

Create a table in a database for storing the personal information. The following SQL code contains an existing person’s details. So we can change those values at runtime without a post-back and button-click.

USE [TestDB]
GO
/****** Object:  Table [dbo].[Autosave]    Script Date: 07/05/2016 11:19:54 ******/
SET ANSI_NULLS ON
GO
SET QUOTED_IDENTIFIER ON
GO
CREATE TABLE [dbo].[Autosave](
	[Id] [int] NULL,
	[firstname] [nvarchar](50) NULL,
	[middlename] [nvarchar](50) NULL,
	[lastname] [nvarchar](50) NULL
) ON [PRIMARY]
GO
INSERT [dbo].[Autosave] ([Id], [firstname], [middlename], [lastname]) VALUES (1, N'Sachin', N'', N'Mortale')


C# Code

The WebMethod will catch the client-side value in the server side. In the given example I am passing the id directly into the update query. You can modify the code for your requirements.

[WebMethod]
    public static string AutoSave(string firstname, string middlename, string lastname)
    {
        int id = 1;
        string ConnectionString = System.Configuration.ConfigurationManager.ConnectionStrings["TestDb"].ConnectionString;
        SqlConnection con = new SqlConnection(ConnectionString);
        {
            string str = "Update Autosave set firstname='" + firstname + "',middlename= '" + middlename + "',lastname= '" + lastname + "' where Id=" + id + "";
            SqlCommand cmd = new SqlCommand(str, con);
            {
                con.Open();
                cmd.ExecuteNonQuery();
                return "True";
            }
        }
    }

Important Section

1. Namespace

The given namespace contains the WebMethod, database connection libraries.

using System.Web.Services;
using System.Data.SqlClient;


2.Reference

Add the following jQuery reference.

http://ajax.googleapis.com/ajax/libs/jquery/1.4.2/jquery.min.js
http://ajax.googleapis.com/ajax/libs/jqueryui/1.8.1/jquery-ui.min.js


Figure 1

Figure 1

Figure 2

Figure 2

Summary

We learned how to automatically save a value into a SQL database using ASP.Net WebMethod and jQuery Ajax.

Introduction
Here I will explain how to play YouTube videos in asp.net application or website using c# or Embed or Display YouTube videos in asp.net website from URL.

Description

In previous articles I explained Show jQuery show YouTube video in modal popup in asp.net website,jQuery add play image icon to youtube videos, jQuery hide youtube video controls , jQuery generate thumbnails for youtube videos and many articles relating to YouTube, asp.net, c#,vb.net and jQuery. Now I will explain how to play YouTube videos in asp.net application or website.

We can embed and play YouTube videos in website from URL in different ways

Method 1

<iframe src=”http://www.youtube.com/embed/FG0fTKAqZ5g&#8221; height=”315″ width=”560″

allowfullscreen=”” frameborder=”0″>

</iframe>


Method 2

<embed src=”http://www.youtube.com/v/FG0fTKAqZ5g&hl=en_US&fs=1&&#8221;

type=”application/x-shockwave-flash” allowscriptaccess=”always”

allowfullscreen=”true” width=”640″ height=”385″>

</embed>

To play YouTube videos in website we need to use the url format like as mentioned above methods because while searching for different videos in YouTube we will get different URL formats to avoid that we can use above URL formats just by replacing video url code.

If you want complete example write following code in your aspx page


<html xmlns=”http://www.w3.org/1999/xhtml”&gt;

<head>

<title>Play Youtube Videos in asp.net website</title>

</head>

<body>

<form id=”form1″ runat=”server”>

<div>

<object width=”640″ height=”385″>

<b>Method1</b>:

<iframe src=”http://www.youtube.com/embed/FG0fTKAqZ5g&#8221; height=”315″ width=”560″allowfullscreen=”” frameborder=”0″>

</iframe><br />

<b>Method2</b>:

<embed src=”http://www.youtube.com/v/FG0fTKAqZ5g&hl=en_US&fs=1&&#8221;

type=”application/x-shockwave-flash”

allowscriptaccess=”always”

allowfullscreen=”true”

width=”640″

height=”385″>

</embed>

</object>

</div>

</form>

</body>

</html>


Reference

Session Time out in ASP.NET

Posted: August 8, 2014 in ASP.Net

Introduction

One of the requirements in my project was to warn users about the session expiry. Though it looks like a simple requirement for the end users, it is not the case for developers and designers. We need to deal with lot of scenarios in the real time application. What is the best way to achieve the objective? Some of the challenges would be like:

  1. Session is a sliding expiry value. It gets extended every time there is a post back.
  2. There are multiple ways that you can handle this scenario and each of them has its own technical challenges.

Approaches

The following section will try to cover few of the approaches to handle session expiry.

1. Provide a Simple Alert

In this approach, the user will be provided with a simple warning message, based on a pre-defined time interval.

<script language="javascript" type="text/javascript">
       var sessionTimeoutWarning = 
	"<%= System.Configuration.ConfigurationSettings.AppSettings
	["SessionWarning"].ToString()%>";
        var sessionTimeout = "<%= Session.Timeout %>";

        var sTimeout = parseInt(sessionTimeoutWarning) * 60 * 1000;
        setTimeout('SessionWarning()', sTimeout);

        function SessionWarning() {
var message = "Your session will expire in another " + 
	(parseInt(sessionTimeout) - parseInt(sessionTimeoutWarning)) + 
	" mins! Please Save the data before the session expires";
alert(message);
        }
</script>

  • sessionTimeoutWarning: is a predefined value in the application configuration. Say 18 minutes.
  • sessionTimeout: holds the session timeout interval. Say 20 minutes. In case the user does not do any post back on the page for about 18 minutes, he will be warned about the session expiry.


2. Provide a Simple Alert and Then Redirect the User to Home Page or Login     Page

<script language="javascript" type="text/javascript">
        var sessionTimeoutWarning = 
	"<%= System.Configuration.ConfigurationSettings.AppSettings
	["SessionWarning"].ToString()%>";
        var sessionTimeout = "<%= Session.Timeout %>";
        var timeOnPageLoad = new Date();
 
        //For warning
        setTimeout('SessionWarning()', parseInt(sessionTimeoutWarning) * 60 * 1000);
        //To redirect to the welcome page
        setTimeout('RedirectToWelcomePage()',parseInt(sessionTimeout) * 60 * 1000);

        //Session Warning
        function SessionWarning() {
            //minutes left for expiry
            var minutesForExpiry =  (parseInt(sessionTimeout) - 
				parseInt(sessionTimeoutWarning));
            var message = "Your session will expire in another " + minutesForExpiry + 
			" mins! Please Save the data before the session expires";
            alert(message);
            var currentTime = new Date();
            //time for expiry
            var timeForExpiry = timeOnPageLoad.setMinutes(timeOnPageLoad.getMinutes() 
				+ parseInt(sessionTimeout)); 

            //Current time is greater than the expiry time
            if(Date.parse(currentTime) > timeForExpiry)
            {
                alert("Session expired. You will be redirected to welcome page");
                window.location = "Default.aspx";
            }
        }

        //Session timeout
        function RedirectToWelcomePage(){
            alert("Session expired. You will be redirected to welcome page");
            window.location = "Default.aspx";
        }
  </script>

In this approach, the user will be warned about the session timeout. If user does not save or do any post back, he would be redirected to the login or home page, once the session interval time expires.

3. Extend User Session

<script language="javascript" type="text/javascript">
        var sessionTimeoutWarning = 
	"<%= System.Configuration.ConfigurationSettings.AppSettings
	["SessionWarning"].ToString()%>";
        var sessionTimeout = "<%= Session.Timeout %>";
        var timeOnPageLoad = new Date();
        var sessionWarningTimer = null;
        var redirectToWelcomePageTimer = null;
        //For warning
        var sessionWarningTimer = setTimeout('SessionWarning()', 
				parseInt(sessionTimeoutWarning) * 60 * 1000);
        //To redirect to the welcome page
        var redirectToWelcomePageTimer = setTimeout('RedirectToWelcomePage()',
					parseInt(sessionTimeout) * 60 * 1000);

        //Session Warning
        function SessionWarning() {
            //minutes left for expiry
            var minutesForExpiry =  (parseInt(sessionTimeout) - 
					parseInt(sessionTimeoutWarning));
            var message = "Your session will expire in another " + 
		minutesForExpiry + " mins. Do you want to extend the session?";

            //Confirm the user if he wants to extend the session
            answer = confirm(message);

            //if yes, extend the session.
            if(answer)
            {
                var img = new Image(1, 1);
                img.src = 'CurrentPage.aspx?date=' + escape(new Date());

                //Clear the RedirectToWelcomePage method
                if (redirectToWelcomePageTimer != null) {
                    clearTimeout(redirectToWelcomePageTimer);
                }
   	       //reset the time on page load
                timeOnPageLoad =  new Date();
                sessionWarningTimer = setTimeout('SessionWarning()', 
				parseInt(sessionTimeoutWarning) * 60 * 1000);
                //To redirect to the welcome page
                redirectToWelcomePageTimer = setTimeout
		('RedirectToWelcomePage()',parseInt(sessionTimeout) * 60 * 1000);
            }

            //*************************
            //Even after clicking ok(extending session) or cancel button, 
	   //if the session time is over. Then exit the session.
            var currentTime = new Date();
            //time for expiry
            var timeForExpiry = timeOnPageLoad.setMinutes(timeOnPageLoad.getMinutes() + 
				parseInt(sessionTimeout)); 

            //Current time is greater than the expiry time
            if(Date.parse(currentTime) > timeForExpiry)
            {
                alert("Session expired. You will be redirected to welcome page");
                window.location = "Default.aspx";
            }
            //**************************
        }

        //Session timeout
        function RedirectToWelcomePage(){
            alert("Session expired. You will be redirected to welcome page");
            window.location = "Default.aspx";
        }
</script>

In this approach, the user will be warned about the session timeout and provides the ability to extend user session. If the user confirms to extend the session, it gets extended. If user confirms after the session expiry timeout limit, even then the user will be logged out. Following lines of code are used to extend the user session. Where 'CurrentPage.aspx is a dummy page in the website.

var img = new Image(1, 1); 
img.src = 'CurrentPage.aspx?date=' + escape(new Date());


Note: In all the above scenarios, I am assuming SetTimeout method and session related variables will be reset whenever there is a post back. This may not work 100%, when there could be partial rendering and the SetTimeoutmethod and session related variables may not be reset. All files are in the Samples folder.

References


In ASP.Net the GridView control does not support selection of a single RadioButton that works as a group across rows. Here we will see how to select only one RadioButton in a GridView using javascript.

Step – 1  In the design drag ang drop a grid view control from the toolbox.
Change the gridview according like below.
<asp:GridView ID=”grdDisply” runat=”server” AutoGenerateColumns=”false”>
<Columns>
<asp:TemplateField HeaderText=”Select”>
<ItemTemplate>
<asp:RadioButton runat=”server” ID=”rbtnSelect” OnClick=”SelectSingleRbtn(this.id)”>
</asp:RadioButton>
</ItemTemplate>
</asp:TemplateField>
<asp:BoundField DataField=”Dosage” HeaderText=”Dosage” />
<asp:BoundField DataField=”Drug” HeaderText=”Drug” />
<asp:BoundField DataField=”Patient” HeaderText=”Patient” />
<asp:BoundField DataField=”Date” HeaderText=”Date” />
</Columns>
</asp:GridView>

Step – 2 In the cs to bind the grid view write the below code.
protected void Page_Load(object sender, EventArgs e)
{
if (!IsPostBack)
{
Bind();
}
}

private void Bind()
{
grdDisply.DataSource = GetTable();
grdDisply.DataBind();
}

static DataTable GetTable()
{
DataTable table = new DataTable();
table.Columns.Add(“Dosage”, typeof(int));
table.Columns.Add(“Drug”, typeof(string));
table.Columns.Add(“Patient”, typeof(string));
table.Columns.Add(“Date”, typeof(DateTime));
table.Rows.Add(10, “A”, “Rabi”, DateTime.Now);
table.Rows.Add(20, “B”, “Bopara”, DateTime.Now);
table.Rows.Add(30, “C”, “Johny”, DateTime.Now);
table.Rows.Add(40, “D”, “Marry”, DateTime.Now);
table.Rows.Add(50, “E”, “Shetty”, DateTime.Now);
return table;
}

Step – 3  In the head section of the add the below javascript code.
<script language=”javascript” type=”text/javascript”>
function SelectSingleRbtn(rdbtnid) {
var rdBtn = document.getElementById(rdbtnid);
var rdBtnList = document.getElementsByTagName(“input”);
for (i = 0; i < rdBtnList.length; i++) {
if (rdBtnList[i].type == “radio” && rdBtnList[i].id != rdBtn.id) {
rdBtnList[i].checked = false;
}
}
}
</script>

In this article I will explain how to display ‘st’, ‘nd’, ‘rd’ and ‘th’ suffix after day numbers in Formatted Date string using C# .
By default .Net does not have any provision to display the display ‘st’, ‘nd’, ‘rd’ and ‘th’ suffix after day numbers in Formatted Date string and hence I have come up with a generic method for accomplishing the task.
HTML Markup
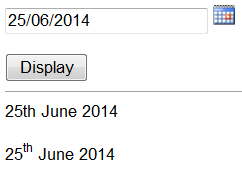
In order to illustrate the working of the function, I am making use of an ASP.Net TextBox along with ASP.Net AJAX Control Toolkit CalendarExtender to allow user select the date and two Labels to display the formatted date output.
<cc1:ToolkitScriptManager ID=”ToolkitScriptManager1″ runat=”server”>
</cc1:ToolkitScriptManager>
<asp:TextBox ID=”txtDate” runat=”server” ReadOnly = “true” />
<asp:ImageButton runat=”server” ID=”imgPopup” ImageUrl=”~/Calendar.png” />
<cc1:CalendarExtender ID=”CalendarExtender1″ runat=”server” TargetControlID=”txtDate”
    PopupButtonID=”imgPopup” Format=”dd/MM/yyyy” />
<br />
<asp:Button Text=”Display” runat=”server” OnClick=”DisplayFormattedDate” />
<hr />
<asp:Label ID=”lbFormattedDate1″ runat=”server” />
<br />
<br />
<asp:Label ID=”lbFormattedDate2″ runat=”server” />
Display ‘st’, ‘nd’, ‘rd’ and ‘th’ suffix after day numbers in Formatted Dates
When the Button is clicked, the selected date is first converted to a DateTime object using the respective Culture. For this example, I am making use of dd/MM/yyyy Date Format in the AJAX Calendar Extender and hence the en-GB culture has been used for conversion.
Then the value of the Day from the DateTime object is passed to the GetSuffix method which returns back the appropriate suffix.
The received suffix is then used to format and display the Date in Label control.
For the second Label, I have made use of HTML <sup> tag (Superscript) to display the suffix a little raised.
C#
protected void DisplayFormattedDate(object sender, EventArgs e)
{
    //Convert the Date to DateTime object. Culture for dd/MM/yyyy format is en-GB.
    DateTime dt = Convert.ToDateTime(Request.Form[txtDate.UniqueID], new System.Globalization.CultureInfo(“en-GB”));
    //Display the date with suffix.
    lbFormattedDate1.Text = string.Format(dt.ToString(“dd{0} MMMM yyyy”), GetSuffix(dt.Day.ToString()));
    //Display the date with suffix as superscript.
    lbFormattedDate2.Text = string.Format(dt.ToString(“dd{0} MMMM yyyy”), “<sup>” + GetSuffix(dt.Day.ToString()) + “</sup>”);
}
private string GetSuffix(string day)
{
    string suffix = “th”;
    if (int.Parse(day) < 11 || int.Parse(day) > 20)
    {
        day = day.ToCharArray()[day.ToCharArray().Length – 1].ToString();
        switch (day)
        {
            case “1”:
                suffix = “st”;
                break;
            case “2”:
                suffix = “nd”;
                break;
            case “3”:
                suffix = “rd”;
                break;
        }
    }
    return suffix;
}
2014-06-26_1629

Introduction

This article shows how to save document files like PDF and Word files into a database using the FileUpload control of ASP.NET.

To help explain this article, I will use the following procedure:

  1. Create a table in a database to store the document files and some other relevant data by which I can fetch the documents from the table.
  2. Create a website with a page that contains some control like “textbox”, “FileUpload” and “Button” on the design part of that page (.aspx).
  3. Write the code in the “.cs” file of that page to save the document files in the database at the “button click” event.

The following is the details of the preceding procedure.

Step 1

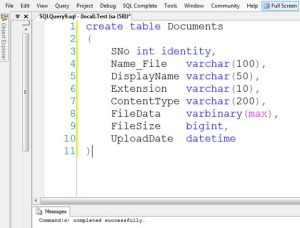
Create a table named “Documents” that will store:

  • Identity column for Serial number
  • Name of the file
  • Display File name that you want to show
  • Extension of file
  • Content Type of file
  • File in binary format
  • Size of file
  • Date of file insertion
create table Documents  
(  
SNo int identity,  
Name_File varchar(100),  
DisplayName varchar(50),  
Extension varchar(10),  
ContentType varchar(200),  
FileData varbinary(max),  
FileSize bigint,  
UploadDate datetime  
 
create table Documents
 

Step 2

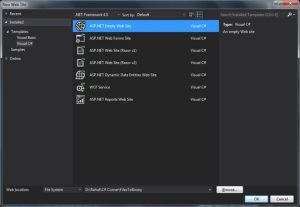
i) Create a new empty website named “FilesToBinary”.

Create a new empty Website

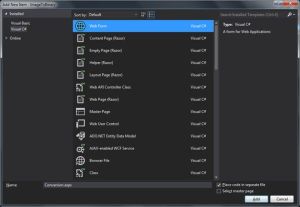
ii) Add a new page named “Conversion.aspx”.

Add a new Page

Step 3

Add 3 the following controls to the page:

  1. TextBox (to display the name of the file)
  2. FileUpload (for selecting the file)
  3. Button with Onclick event (for submitting the image)

Display Name

 
 <asp:TextBox ID=“txtfilename” runat=“server”>  
        </asp:TextBox>  
<br />  
  
Select File  
<asp:FileUpload ID=“FileUpload1” runat=“server” />  
<br />  
  
<asp:Button ID=“Button1” runat=“server”  
    Text=“Convert” OnClick=“Button1_Click” />
 
Write the code to insert the file into the database on the click event of the button.
 
protected void Button1_Click(object sender, EventArgs e)
    {
        if (!FileUpload1.HasFile)
        {
            Response.Write(“No file Selected”); return;
        }
        else
        {
            string filename = Path.GetFileName(FileUpload1.PostedFile.FileName);
            string extension = Path.GetExtension(filename);
            string contentType = FileUpload1.PostedFile.ContentType;
            HttpPostedFile file = FileUpload1.PostedFile;
            byte[] document = new byte[file.ContentLength];
            file.InputStream.Read(document, 0, file.ContentLength);
 
            //Validations
if ((extension == “.pdf”) || (extension == “.doc”) || (extension == “.docx”) || (extension == “.xls”))//extension
            {
                if (file.ContentLength <= 31457280)//size
                {
                    //Insert the Data in the Table
                    using (SqlConnection connection = new SqlConnection())
                    {
connection.ConnectionString = ConfigurationManager.ConnectionStrings[“constr”].ToString();
                        connection.Open();
                        SqlCommand cmd = new SqlCommand();
                        cmd.Connection = connection;
                        string commandText = @”insert into Documents(Name_File,DisplayName,Extension,ContentType,FileData,FileSize,UploadDate)   values(@Name_File,@DisplayName,@Extension,@ContentType,@FileData,@FileSize,getdate())”;
                        cmd.CommandText = commandText;
                        cmd.CommandType = CommandType.Text;
                        cmd.Parameters.Add(“@Name_File”, SqlDbType.VarChar);
                        cmd.Parameters[“@Name_File”].Value = filename;
                        cmd.Parameters.Add(“@DisplayName”, SqlDbType.VarChar);
 
                        cmd.Parameters[“@DisplayName”].Value = txtfilename.Text.Trim();
                        cmd.Parameters.Add(“@Extension”, SqlDbType.VarChar);
                        cmd.Parameters[“@Extension”].Value = extension;
 
                        cmd.Parameters.Add(“@ContentType”, SqlDbType.VarChar);
                        cmd.Parameters[“@ContentType”].Value = contentType;
 
                        cmd.Parameters.Add(“@FileData”, SqlDbType.VarBinary);
                        cmd.Parameters[“@FileData”].Value = document;
 
                        cmd.Parameters.Add(“@FileSize”, SqlDbType.BigInt);
                        cmd.Parameters[“@FileSize”].Value = document.Length;
                        cmd.ExecuteNonQuery();
                        cmd.Dispose();
                        connection.Close();
                        Response.Write(“Data has been Added”);
                    }
                }
                else
                { Response.Write(“Inavlid File size”); return; }
            }
            else
            {
                Response.Write(“Inavlid File”); return;
            }
        }
    }


Note: You can also add some other validations like:
  • Check the length of file on client side.
  • Check the MIME type of the file on server side.

Step 4

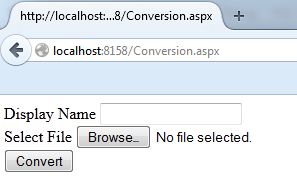
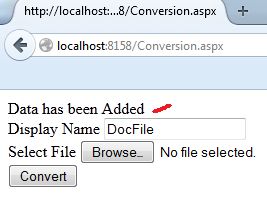
Run the page; it will be like:

Run the Page

Now I will upload 3 files of various types like Word, PDF and Excel files one by one using the following procedure:

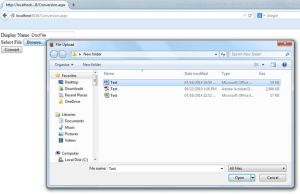
  1. Fill in the Display name and click on the browse button to select the file.

upload files


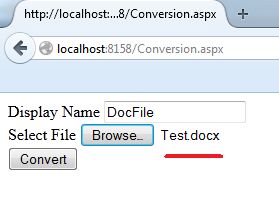
2.After selecting the file.

After selecting the file

3.Click on the convert button to save the file.

covert button

Then do the same procedure for PDF and Excel files.

Result

Now you can see all the files were saved in the database in binary format.

saved in the database


Introduction: 

In this article I will explain what is authorization in asp.net, uses of authorization and I will explain setting authorization rules in web.config to allow or deny resources for particular user or role in asp.net.


Description: 

Today I am writing this post to explain about authorization concept in asp.net. In one of the interview interviewer has asked question like what is authorization in asp.net and how we can use authorization concept to allow or deny resources to particular user or role in asp.net.


What is an authorization in asp.net?
Authorization is process of allowing or denying particular resources to user or role in asp.net.
We will discuss this topic with example first create new website and check everything with examples
Once we create website open web.config file and check how it would be if you observe in configurationsection under system.web section we are able to see only authentication mode there is no authorization mode exists that would be just like this

<configuration>
<system.web>
<!--The <authentication> section enables configurationof the 
security authentication mode used byASP.NET to identify an incoming user.-->
<authentication mode="Windows" />
</system.web>
</configuration>

Here we need to change authentication mode to “Forms” to implement authorization concept in web.config file. After change authentication mode we need to add authorization in system.web section to implement our custom requirements like allow or deny resources to particular user / role.  Now we will start with section like deny anonymous user’s access to website i.e. the persons whoever login into our website only those are able to access application.


<configuration>
<system.web>
<authentication mode=”Forms”>
</authentication>
<authorization>
<deny users=”?”/><!–will deny anonymous users–>
</authorization>
</system.web>
</configuration>

(Note: The above situation is used whenever user’s accounts created by some administrator to access the application.)

In some situations we will get requirement like we need to allow users to access the particular page and restrict other pages access only to logged/authenticated users.

Example: I have website now I want to allow all users to access only Registration page to register in website and allow only logged / authenticated users to access remaining pages in website.

In this situation we need to write the code like this

<configuration>
<system.web>
<authentication mode=”Forms”/>
<authorization>
<deny users=”?”/>  <!–This will restrict anonymous user access–>
</authorization>
</system.web>
<location path=”Registration.aspx”> <!– Path of your Registration.aspx page –>
<system.web>
<authorization>
<allow users=”*”/> <!– This will allow users to access to everyone to Registeration.aspx–>
</authorization>
</system.web>
</location>
</configuration>


Here location path should be your page path my page exists in root folder of application that’s why I given direct path if your page exists in another folder we need to change location path should be like this~/UserDetails/Registration.aspx.
Till now we seen how to allow authenticate users to access webpage now we will discuss how to allow only particular user to access website and deny all other users
In this situation we need to write the code in web.config file like this

<configuration>
<system.web>
<authorization>
<allow users="SachinMortale"/>  <!-- It will allow only SachinMortale-->
<deny users="*"/>  <!--Deny others -->
</authorization>
</system.web>
</configuration>

If we observe above code it will allow only user “SachinMortale” and deny all other users to access that application. If we want to give permission for more users just add usernames separated with comma like “SachinMortale,Mahesh,Madhav,etc”
Now if we want to allow only one user to access particular page and deny access to other users to particular page write the code like this


<configuration>
<location path="Registration.aspx"> <!-- Path of your Registration.aspx page -->
<system.web>
<authorization>
<allow users="SachinMortale"/>
<deny users="*"/> <!—deny all other users --></authorization></system.web></location></configuration>
Introduction:
In this article I will explain how to send Gridview as email body in asp.net using C#.
Description
To implement this concept design your aspx page like this
 
<html xmlns=”http://www.w3.org/1999/xhtml”&gt;
<head id=”Head1″>
<title>send gridview in email body in asp.net using C#</title>
</head>
<body>
<form id=”form1″ runat=”server”>
<div>
<asp:GridView ID=”gvUserInfo” runat=”server”>
<HeaderStyle BackColor=”#df5015″ Font-Bold=”true” ForeColor=”White” />
</asp:GridView>
</div>
<asp:Button ID=”btnSendMail” runat=”server” Text=”Send Gridview As Mail” onclick=”btnSendMail_Click” />
</form>
</body>
</html>
 
Now add the following namespaces in code behind
 
using System;
using System.Web;
using System.Data.SqlClient;
using System.Data;
using System.Net.Mail;
using System.Text;
using System.IO;
using System.Web.UI;
using System.Web.UI.WebControls;
 
After add namespaces write the following code in code behind
 
protected void Page_Load(object sender, EventArgs e)
{
if (!IsPostBack)
{
BindGridview();
}
}
 
// This method is used to bind gridview from database
protected void BindGridview()
{
SqlConnection con = new SqlConnection(Data Source=Sachin;Integrated Security=true;Initial Catalog=SampleDB);
con.Open();
SqlCommand cmd = new SqlCommand(SELECT TOP 10 UserName,FirstName,LastName,Location FROM UserInfo, con);
SqlDataAdapter da = new SqlDataAdapter(cmd);
DataSet ds = new DataSet();
da.Fill(ds);
gvUserInfo.DataSource = ds;
gvUserInfo.DataBind();
}
protected void btnSendMail_Click(object sender, EventArgs e)
{
SendHTMLMail();
}
 
// Method Which is used to Get HTML File and replace HTML File values with dynamic values and send mail
public void SendHTMLMail()
{
MailMessage Msg = new MailMessage();
MailAddress fromMail = new MailAddress(“admin@sachinmortale.blogspot.com”);
// Sender e-mail address.
Msg.From = fromMail;
// Recipient e-mail address.
Msg.To.Add(new MailAddress(“sachin@gmail.com”));
// Subject of e-mail
Msg.Subject = “Send Gridivew in EMail”;
Msg.Body += “Please check below data <br/><br/>”;
Msg.Body += GetGridviewData(gvUserInfo);
Msg.IsBodyHtml = true;
string sSmtpServer = “”;
sSmtpServer = “10.2.160.101”;
SmtpClient a = new SmtpClient();
a.Host = sSmtpServer;
a.EnableSsl = true;
a.Send(Msg);
}
// This Method is used to render gridview control
public string GetGridviewData(GridView gv)
{
StringBuilder strBuilder = new StringBuilder();
StringWriter strWriter = new StringWriter(strBuilder);
HtmlTextWriter htw = new HtmlTextWriter(strWriter);
gv.RenderControl(htw);
return strBuilder.ToString();
}
public override void VerifyRenderingInServerForm(Control control)
{
/* Verifies that the control is rendered */
}
Introduction:
Here I will explain simple jQuery image slideshow with next previous button options or Simple jQuery image slideshow with next previous button options example in asp.net.
<head>
<title>jQuery Simple image slideshow with next previous button in Asp.net</title>
<script src=”http://code.jquery.com/jquery-1.8.2.js&#8221; type=”text/javascript”></script>
<script type=”text/javascript”>
$(function () {
var currentPosition = 0;
var slideWidth = 500;
var slides = $(‘.slide’);
var numberOfSlides = slides.length;
var slideShowInterval;
var speed = 3000;
//Assign a timer, so it will run periodically
slideShowInterval = setInterval(changePosition, speed);
slides.wrapAll(‘<div id=”slidesHolder”></div>’)
slides.css({ ‘float’: ‘left’
});
//set #slidesHolder width equal to the total width of all the slides
$(‘#slidesHolder’).css(‘width’, slideWidth * numberOfSlides);
$(‘#slideshow’).prepend(‘<span id=”leftNav”>Move Left</span>’)
.append(‘<span id=”rightNav”>Move Right</span>’);
manageNav(currentPosition);
//tell the buttons what to do when clicked
$(‘.nav’).bind(‘click’, function () {
//determine new position
currentPosition = ($(this).attr(‘id’) == ‘rightNav’) ? currentPosition + 1 : currentPosition – 1;
//hide/show controls
manageNav(currentPosition);
clearInterval(slideShowInterval);
slideShowInterval = setInterval(changePosition, speed);
moveSlide();
});
function manageNav(position) {
if (position == 0) {
$(‘#leftNav’).hide()
}
else {
$(‘#leftNav’).show()
}
if (position == numberOfSlides – 1) {
$(‘#rightNav’).hide()
}
else { $(‘#rightNav’).show() }
}
function changePosition() {
if (currentPosition == numberOfSlides – 1) {
currentPosition = 0;
manageNav(currentPosition);
}
else {
currentPosition++;
manageNav(currentPosition);
}
moveSlide();
}
function moveSlide() {
$(‘#slidesHolder’).animate({ ‘marginLeft’: slideWidth * (-currentPosition) });
};
});
</script>
<style type=”text/css”>
#slideshow {
position: relative;
}
#slideshow #slideshowWindow {
height: 257px;
margin: 0;
overflow: hidden;
padding: 0;
position: relative;
width: 500px;
}
#slideshow #slideshowWindow .slide {
height: 257px;
margin: 0;
padding: 0;
position: relative;
width: 500px;
}
#slideshow #slideshowWindow .slide .slideText {
background-repeat: repeat;
color: #FFFFFF;
font-family: Myriad Pro,Arial,Helvetica,sans-serif;
height: 130px;
left: 0;
margin: 0;
padding: 0;
position: absolute;
top: 130px;
width: 100%;
}
#slideshow #slideshowWindow .slide .slideText a:link, #slideshow #slideshowWindow .slide .slideText a:visited {
color: #FFFFFF;
text-decoration: none;
}
#slideshow #slideshowWindow .slide .slideText h2, #slideshow #slideshowWindow .slide .slideText p {
color: #FFFFFF;
margin: 10px 0 0 10px;
padding: 0;
}
.nav
{
display:block;
text-indent:-10000px;
position:absolute;
cursor:pointer;
}
#leftNav
{
top:223px;
left:320px;
width:94px;
height:34px;
background-repeat:no-repeat;
z-index:999;
}
#rightNav
{
top:225px;
left:450px;
width:53px;
height:26px;
background-repeat:no-repeat;
z-index:999;
}
</style>
</head>
<body>
<div id=”slideshow”>
<div id=”slideshowWindow”>
<div>
<div>
<h2>Slide 1</h2>
<p>Aspdotnet-Suresh.com will offer best articles on Asp.net, c#, SQL Server, jQuery and many more technologies.</p>
<p><a href=”#”>click here</a></p>
</div>
</div>
<div>
<div>
<h2>Slide 2</h2>
<p>Aspdotnet-Suresh.com will offer best articles on Asp.net, c#, SQL Server, jQuery and many more technologies.</p>
<p><a href=”#”>click here</a></p>
</div>
</div>
<div>
<div>
<h2>Slide 3</h2>
<p>Aspdotnet-Suresh.com will offer best articles on Asp.net, c#, SQL Server, jQuery and many more technologies.</p>
<p><a href=”#”>click here</a></p>
</div>
</div>
</div>
</div>
</body>
</html>
Introduction
Here I will explain how to get title & meta description of url in asp.net using C# or get page title and description from page url in asp.net using HTMLAgilityPack in C# .
To get title & description of url we need to write the following code in aspx page
<head>
<title>Get Title and Meta Description from Live URL</title>
</head>
<body>
<form id=”form1″ runat=”server”>
<div>
<h3>Get Title and Meta Description from Live URL</h3>
<table>
<tr>
<td>
<b>Enter Url:</b>
</td>
<td>
<asp:TextBox ID=”txtURL” runat=”server” AutoPostBack=”True” ontextchanged=”txtURL_TextChanged” Width=”250px”></asp:TextBox>
</td>
</tr>
<tr>
<td>
<b>Title:</b>
</td>
<td>
<asp:TextBox ID=”txtTiltle” runat=”server” Width=”250px”></asp:TextBox>
</td>
</tr>
<tr>
<td valign=”top”>
<b>Description:</b>
</td>
<td>
<asp:TextBox ID=”txtDesc” runat=”server” Rows=”7″ Columns=”40″ TextMode=”MultiLine”></asp:TextBox>
</td>
</tr>
</table>
</div>
</form>
</body>

</html>

Now in code behind add the following namespaces
C# Code
using System;
using System.Net;
using System.Text.RegularExpressions;

using HtmlAgilityPack;

Here I added new HtmlAgilityPack namespace by using this reference we can parse out HTML pages you can get this dll reference from attached sample folder or from this url http://htmlagilitypack.codeplex.com

Now add below code in code behind

protected void txtURL_TextChanged(object sender, EventArgs e)
{
String url = txtURL.Text;
//Get Title
WebClient x = new WebClient();
string source = x.DownloadString(url);
txtTiltle.Text = Regex.Match(source, @”\<title\b[^>]*\>\s*(?<Title>[\s\S]*?)\</title\>”, RegexOptions.IgnoreCase).Groups[“Title”].Value;
//Method to get Meta Tags
GetMetaTagValues(url);
}
private void GetMetaTagValues(string url)
{
//Get Meta Tags
var webGet = new HtmlWeb();
var document = webGet.Load(url);
var metaTags = document.DocumentNode.SelectNodes(“//meta”);
if (metaTags != null)
{
foreach (var tag in metaTags)
{
if (tag.Attributes[“name”] != null && tag.Attributes[“content”] != null && tag.Attributes[“name”].Value == “description”)
{
txtDesc.Text = tag.Attributes[“content”].Value;
}
}
}

}